How to Build a DIY Water Fountain
There are a plethora of options when it comes to a garden water feature. You are only limited by your imagination, and perhaps your wallet. In this article, we will explain how to build a DIY water fountain.
The addition of a water feature in your landscaping adds interest and can have a positive effect on your overall wellness. The benefits of living around water are well documented and range from boosting mood to improved immune systems. The best part is you don’t have to DO anything to receive the benefits. It happens as if by osmosis. (Not really – that’s a water joke.)
The good news is you don’t have to live on the coast to receive the health benefits of water on your health. A patio water fountain emits the same soft sounds of flowing, trickling, bubbling water as any large body of H2O.
You can make a water fountain out of almost anything. For this project, we suggest using two different-sized glazed terra cotta or ceramic garden pots. You can get these in a variety of shapes and colors which instantly adds interest to your patio.

DIY Fountain Materials:
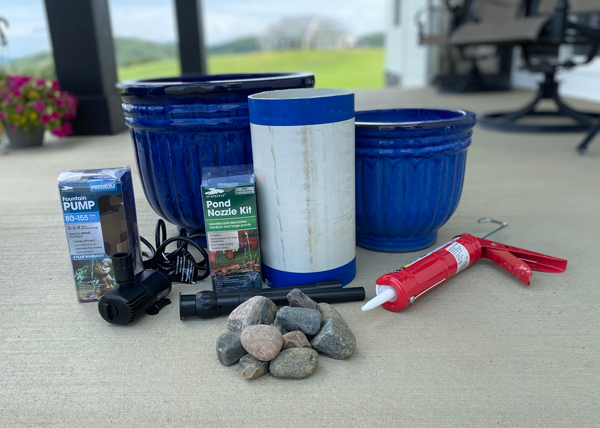
Two planters
-
- One large planter and one small
- The planters will need to be sturdy enough to hold the weight of the water, decorative rock, and pump
Silicone Caulk
-
- Caulk will be used to seal the holes in the bottom of the large pot. You can use a rubber drain plug to fill the bulk of the hole and then seal around it with caulk.
One Plastic Saucer (optional)
-
- This saucer should be slightly smaller than the top of the bottom planter. It will fit just inside the opening. You’ll see why very soon.
Drill and Drill Bit
-
- The drill bit needs to be large enough to allow the pump extension tube to comfortably fit through without being too tight.
PVC Pipe – Plastic Pot – Bucket Riser
-
- A piece of PVC pipe cut to length works well as a riser for this part of the project.
- An inexpensive plastic flower pot turned upside down is an alternative to the PVC pipe riser.
- Another riser option is an upside-down bucket. The bucket needs to be tall enough to elevate the top planter appropriately.
Fountain Water Pump
-
- The water pump must have enough vertical lift to pump the water from the bottom planter through the upper pot and out the nozzle. You can find this information in the specs of the pump. See examples here.
- Be sure your pump has an extension tube long enough to reach the top of the upper pot. If it doesn’t, you will need to purchase an additional length of tubing.
Directions:
Bottom Planter Prep
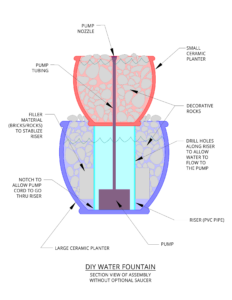
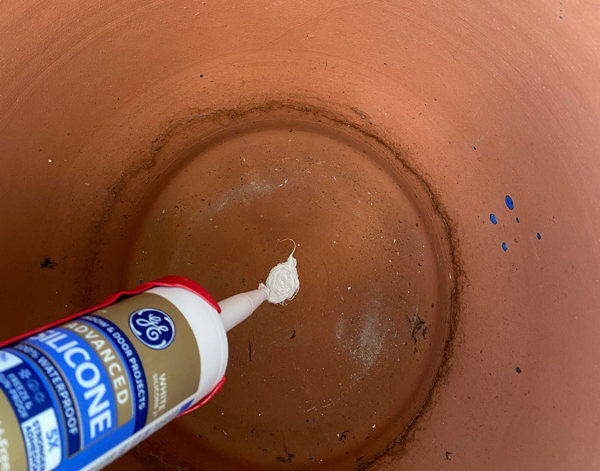
This DIY water fountain is self-contained. This means there is no need to dig a hole in the ground and bury a reservoir. Because the lower planter is acting as the reservoir, you need to plug any holes in the large planter. If the hole is large, use a rubber drain plug and then seal with silicone caulk. Otherwise, fill the hole with caulk as in our example. After an hour or so, turn the large planter over and seal the underside as well. This should be completely set before adding water to the fountain.
While the silicone is setting, drill a hole in the center of the plastic saucer. This hole should be large enough to accommodate the pump extension tube that feeds the fountain. The saucer creates a false bottom that will be covered with decorative rocks to hide the mechanics of the pump and riser below. If you have enough filler material (bricks, concrete pieces, decorative rocks) the saucer can be omitted.
Riser Choice
For the next step, you will need to decide which riser option is best for your application. The riser creates an elevated surface on which the saucer and upper planter will rest. This is where you will use either a length of PVC pipe, plastic flower pot, or a bucket. The piece will need to be large enough to enclose the pump at the bottom of the planter. Drill holes in the sides of the riser so the water will circulate properly inside your fountain. Create a notch in the bottom of the riser to accommodate the pump’s power cord.
Final Location
At this point, it is best to move the large planter to the fountain’s final location. The fountain will start to get heavy and will not be easy to move. The ideal spot has access to a power outlet and your favorite chair. 😎
Assembly
Once you have scouted out the perfect spot for your water fountain, begin the assembly. Put the pump in the bottom planter, followed by the riser piece (PVC pipe, upside-down flower pot, upside-down bucket). Run the power cord through the notch you created in the riser and out the top of the large planter. Add bricks or other filler material around the riser to steady it in place. It doesn’t have to look pretty; it will not be seen once the fountain is complete. You just want something between the wall of the planter and the riser to keep it from wobbling.
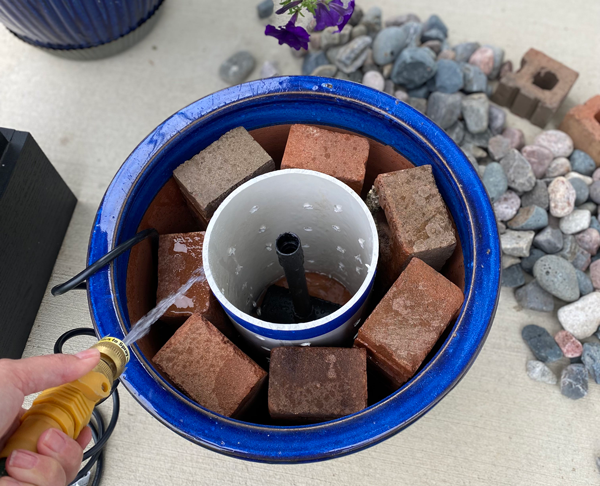
After filling the bottom planter with water, it’s time to place the saucer on top of the riser. Thread the pump extension tube through the hole you drilled earlier. This piece creates a false bottom where the decorative rocks lay, but it is not necessary. In the example shown here, the saucer was not used.
Now it’s time to add the small planter to the assembly. Line up the hole with the pump extension tube and place it on top of the riser/saucer.

Next, add filler material to the top planter, then the decorative rock to the smaller planter and around the bottom of the smaller planter on top of the saucer. Arrange the rocks to hide the mechanics of your DIY fountain.
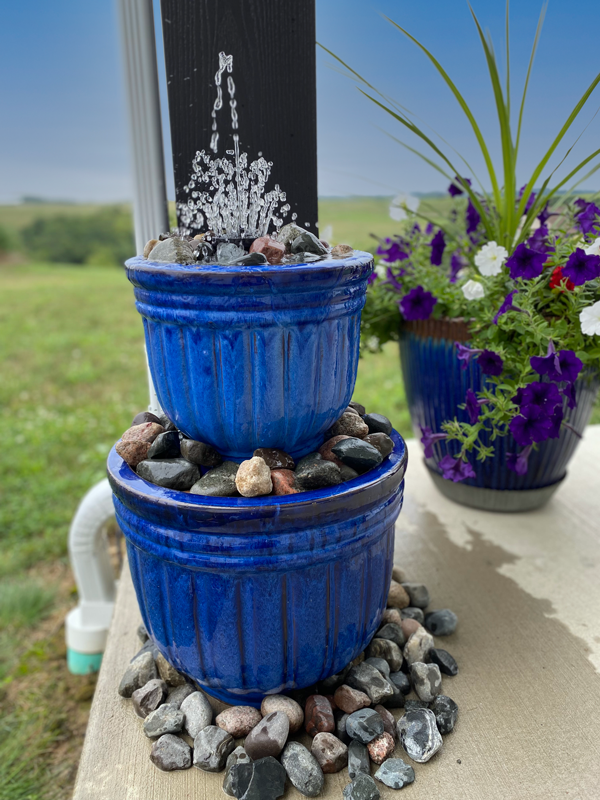
Finally, finish filling the planter with water and plug in the pump. Now you’re ready to enjoy the peaceful sounds of running, bubbling water in your backyard.
Final Thoughts
You need to make adjustments along the way. In this example, we added a brick to the bottom planter to raise the level of the pump to achieve the height needed. The overall height of this assembled planter fountain is approximately 21 inches. The pump we purchased was rated for a water lift of 24 – 36 inches and yet, it did not perform adequately. Our recommendation is to go with a more powerful pump than you think you will need.
Most pumps come as a kit with a couple of different nozzle heads to suit your preference. If your pump does not have the style of nozzle you want, different nozzles are available. Nozzles come as a waterspray, foamjet, waterbell, or trumpet just to name a few.
Water will need added to the fountain during the hot summer months due to evaporation. Most pumps have an automatic shut-off in the event of water loss. It is important to look for that feature when purchasing the pump.
Wilson Blacktop is your local landscaping material supplier. Visit our website to see our selection of decorative rocks.


